
Up and Down Markers using Conditional Formatting


There is a super-obscure way to add up/down markers to a pivot table to indicate an increase or a decrease.

Somewhere outside the pivot table, add columns to show increases or decreases. In the figure below, the difference between I6 and H6 is 3, but you just want to record this as a positive change. Use SIGN(I6-H6) to get either +1, 0, or -1.

The pivot table has Monday in H, Tuesday in I, Wednesday in J. Off the the right, two new columns are calculating the change from the previous day. The Tuesday change is =SIGN(I6 - H6). This gets you either a negative 1, zero, or one.

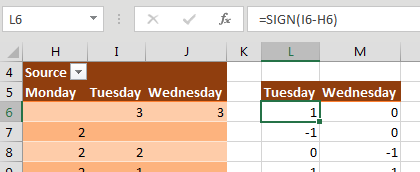
Select the two-column range showing the sign of the change and then select Home, Conditional Formatting, Icon Sets, 3 Triangles. (I have no idea why Microsoft called this option 3 Triangles, when it is clearly 2 Triangles and a Dash, as shown below.)

Now that you've generated some values of -1, zero, and one, select those helper cells and apply, Home, Conditional Formatting, Icon Sets, 3 Triangles. Note that the name called "3 Triangles" is a lie - the icon set has a green up icon, a yellow "no change" icon, and a red "down" icon. Technically, it should be called two triangles and a rectangle.

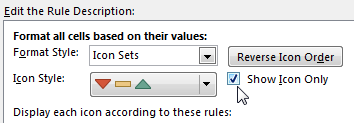
With the same range selected, now select Home, Conditional Formatting, Manage Rules, Edit Rule. Check the Show Icon Only checkbox.

Manage the rules, and check the box for Show Icon Only. This prevents the 1, 0, -1 from appearing in the cells.

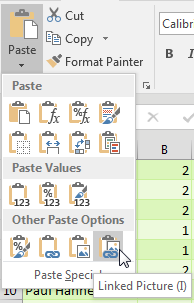
With the same range selected, press Ctrl+C to copy. Select the first Tuesday cell in the pivot table. From the Home tab, open the Paste dropdown and choose Linked Picture. Excel pastes a live picture of the icons above the table.

Copy the range of icons. Select the first Tuesday cell in the pivot table. On the Home tab, open the Paste Dropdown. The very last icon is called Linked Picture (I). Select this.

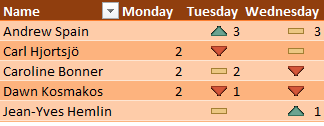
At this point, adjust the column widths of the extra two columns showing the icons so that the icons line up next to the numbers in your pivot table, as shown below.

Now, you have overlaid pictures of the Up/Flat/Down icon next to the numbers in the pivot table.

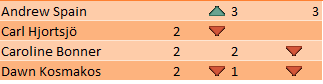
If you don‘t like it , select Home, Conditional Formatting, Manage Rules, Edit. Open the dropdown for the thick yellow dash and choose No Cell Icon, and you get the result shown below.

Up and down indicators still remain, but the yellow rectangles indicating "no change" are gone.

Comments

Popular posts from this blog

Import CSV In Power BI

  Import CSV file Click on Get Data à More à File option and select Text/CSV . Navigate to the CSV file which needs to be imported FL_insurance_sample.csv . Select the file and click on Open. FL_insurance_sampleDownload In the CSV window on top we have 3 dropdowns, preview of data and data load options.  Select Load and it will load to power query editor window. In the Power query editor the CSV file is loaded as a Queries . In power query editor we can edit, clean and transform the file as required. 3 Dropdowns and Data Load File Origin – Type of file origin. By default its 1252 Wester European (Windows). It’s the file type as per OS and region and country. Delimiter – Delimiter for column separation. By default it detects the delimiter from data , If the delimiter is not from the default options then we can select custom delimiter. Data Type Detection – By default it detects data types of columns based on top 200 rows, we can select entire data or do not detect data type ...

Year Over Year calculation using Pivot Table

Instead of creating a formula outside of the pivot table, you can do this inside the pivot table. Start from the image with column D empty. Drag Revenue a second time to the Values area. Look in the Columns section of the Pivot Table Fields panel. You will see a tile called Values that appears below Date. Drag that tile so it is below the Date field. Your pivot table should look like this: Double-click the Sum of Revenue2 heading in D4 to display the Value Field Settings dialog. Click on the tab for Show Values As. Change the drop-down menu to % Difference From. Change the Base Field to Date. Change the Base Item to (Previous Item). Type a better name than Sum of Revenue2 - perhaps % Change. Click OK. You will have a mostly blank column D (because the pivot table can't calculate a percentage change for the first year. Right-click the D and choose Hide.

Formatting In Excel - helps you find meaning in the spreadsheet

  Formatting In Excel -  helps you find meaning in the spreadsheet  Spreadsheets are often seen as boring and pure tools of utility, but that doesn't mean that we can't bring some style and formatting to our spreadsheets Formatting helps your user find meaning in the spreadsheet without going through each and every individual cell. Cells with formatting will draw the viewer's attention to the important cells. In Excel, formatting worksheet data is easy. You can use several fast and simple ways to create professional-looking worksheets that display your data effectively. For example, you can use document themes for a uniform look throughout all of your Excel spreadsheets, styles to apply predefined formats, and other manual formatting features to highlight important data. Formatting a Data Raw Data   Using Font, Number tabs as shown in image to do a simple formatting   Formatting a Data with help of formatting tools in Excel  As shown in image , we have Prod...